Timesheets & Time Tracking: Staff Guidance
Access in Workday
Access Workday Time Tracking
- To access the system, follow this link: https://www.myworkday.com/teachforamerica. Your login credentials are the same as your TFA network user name and password.
- Once you are on your Workday landing page, click the Menu at the upper left. Select the Time icon.
- Choose from the following options:
Basic Time Entry
NEVADA AND CALIFORNIA NON-EXEMPT EMPLOYEES: Please refer to CA & NV-specific guidance for time entry.
Enter Time in Workday (Non-Exempt* & Exempt Employees)
There are two ways to enter time within Workday. You can enter hours worked for each day of the week, or use "Quick Add" to add your hours worked.
NOTE: TFA policy only allows the submission of future time in cases of requesting time off (PTO, Sick Time, Floating Holidays, etc.). You cannot submit hours worked for a future date, as we need to record time worked after-the-fact. |
*See guidance pertaining specifically to non-exempt (hourly) staff.
1. Once you are on your Workday landing page, click the Menu at the upper left. Select the Time icon.
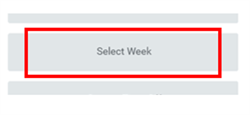
...then choose “This Week,” “Last Week,” or “Select Week,” which allows you to select the date range you would like to enter information.
2. From the ‘Enter Time’ page, you can enter time by clicking inside of any day of the week, or by clicking Actions —> Enter Time towards the top right of the screen.
3. You must then complete all fields of the ‘Enter Time’ field marked with a red asterisk (*). See below for instructions on completing each field.
| 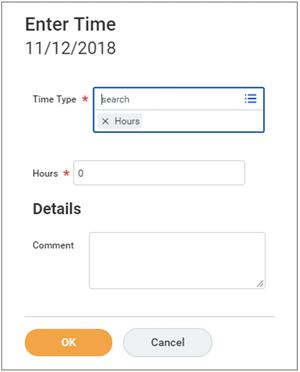 |
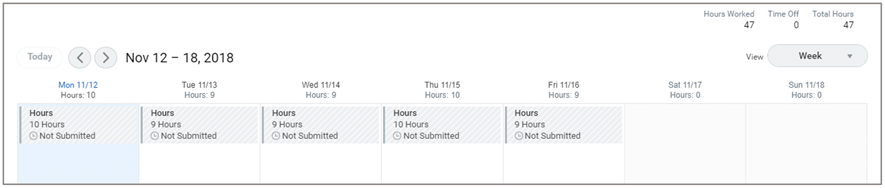
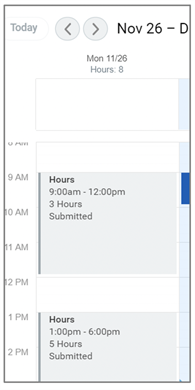
4. Repeat the time entry process for every day of the week you worked and have hours to log. Your timesheet should look similar to this:
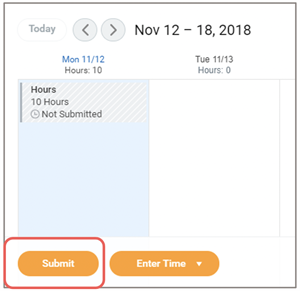
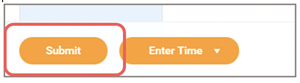
5. When you are ready to submit your timesheet for the week, click the “Submit” button located in the bottom left corner. This sends your timesheet to your manager for approval.
| Compliance Note: You will not be allowed to submit a timesheet with hours worked in the future. You may only submit future time if the week only contains a time off request. |
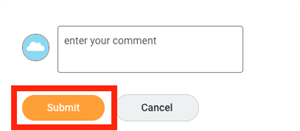
6. Click “Submit” again to confirm your hours are correct. If you need to make changes, select “Cancel” to return to the ‘Enter Time’ screen. You may also add comments here if you would like to note something on your timesheet for your approving manager.
CA & NV Time Entry
For TFA staff in California or Nevada, entering hours is a bit different given state rules and regulations regarding tracking employee time worked. Employment laws in these states require employees to enter time in a more detailed format, as well as track when breaks are taken. This means that if you work in California or Nevada, you need to enter your time blocks for when you arrive to work, when you leave work, and for any breaks you take; this is referred to as “In” and “Out” times. Please read through our Staff Policies to verify the rules for your area.
As a non-exempt employee in CA or NV, you are entitled to a meal break allowance after 5 consecutive hours worked. If you enter 5 or more hours into a time block the system will ask you how to treat your meal break. Here are your choices.
- If your manager has asked you to work through your meal break, then you must select “NO,” in the field “Meal Break Penalty,” which will compensate you for working through your meal break.
- However, if you chose not to go on a break, then select "YES," in the field “Meal Break Penalty,” which means it was your choice to work through your break.
Enter Time in Workday: CA & NV
1. Click the Time worklet and choose “This Week,” “Last Week,” or “Select Week,” which allows you to select the date range you would like to enter information.
2. From the ‘Enter Time’ page, you can enter time by clicking inside of any day of the week, or by clicking Actions —> Enter Time towards the top right of the screen.
3. You must then complete all fields of the ‘Enter Time’ field marked with a red asterisk (*). See below for instructions on completing each field.
| 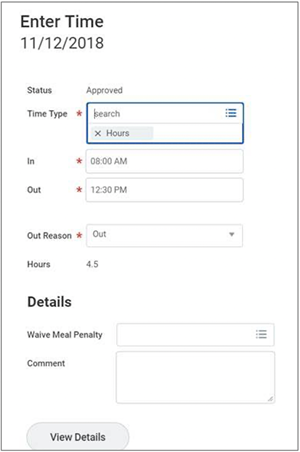 |
| NOTE: The time entry window and fields will look different depending on what you choose as a “Time Type.” Selecting PTO, Sick time, or Floating Holidays will require different information to be entered. Check out the Requesting Time Off guidance for more information on this process. |
a. You will see your first time block entered for the day. Double click under the time block to enter a second time entry.
 | If you took a break, you will need to enter two time blocks for the day; reflecting the break you took in between. |
4. Complete the ‘Time Entry’ form for your second block of work using the same steps above. Click “OK” when you are done.
5. When successfully completed, you will see two time entry boxes on your timesheet.
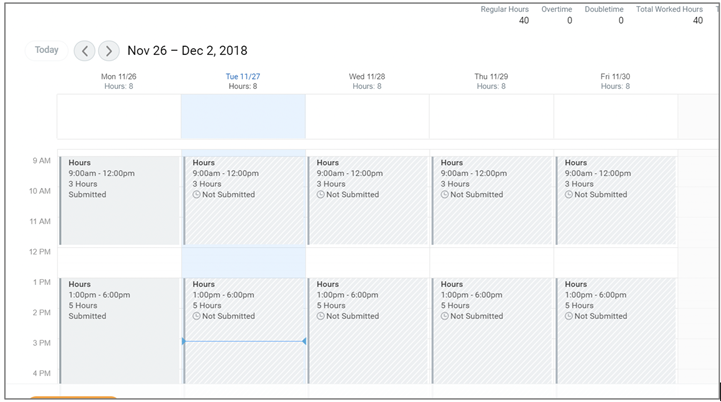
6. Repeat this process for every day of the week you worked and have hours to log. Your timesheet should look similar to this:
7. When you are ready to submit your timesheet for the week, click the “Submit” button located in the bottom left corner. This sends your timesheet to your manager for approval.
| Compliance Note: You will not be allowed to submit a timesheet with hours worked in the future. You may only submit future time if the week only contains a time off request. |
8. Click “Submit” again to confirm your hours are correct. If you need to make changes, select “Cancel” to return to the ‘Enter Time’ screen. You may also add comments here if you would like to note something on your timesheet for your approving manager.
Enter Time with Quick Add
Use "Quick Add" to Enter Time
Entering time day-by-day can be time consuming. Fortunately, there is a quick and easy way to add hours for the entire week! Using this option allows you to quickly add hours to a week without having to do a manually entry for each day.
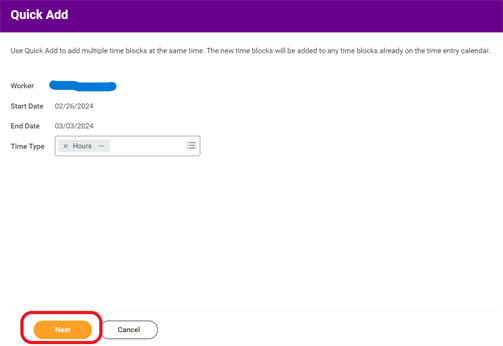
1. When on the ‘Enter Time’ page, select “Quick Add” from the “Actions” menu towards the top right of the screen.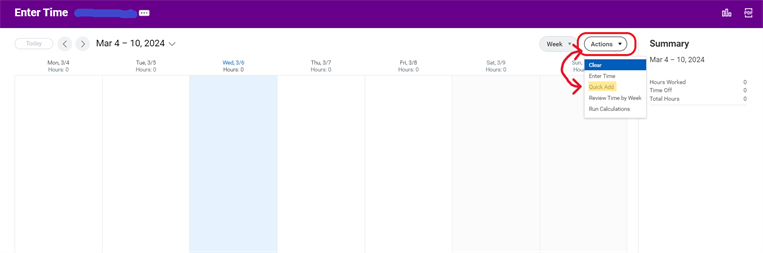
2. This will bring you to the ‘Quick Add’ screen. In the “Time Type” field, you may enter “Hours Worked” or “PTO.” This information will apply to all of the days of the week for which you enter hours.
Click “Next” to continue.
3. Enter time for any day of the week you choose.
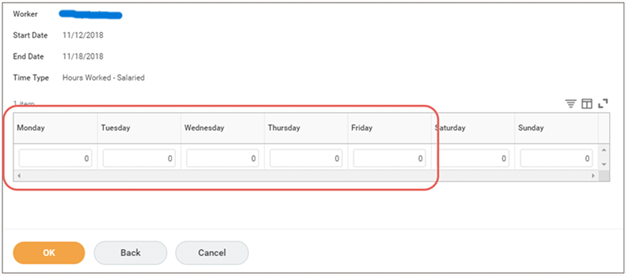
4. Once you have entered all of your hours, click OK.

5. You should now see these hours added your timesheet. Each block of hours added using ‘Quick Add’ share the same time type you selected.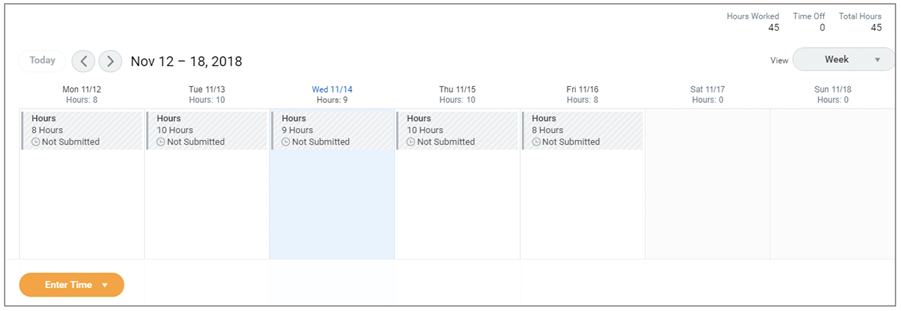
6. When you are ready to submit your timesheet for the week, click the “Submit this Week” button located on the bottom left.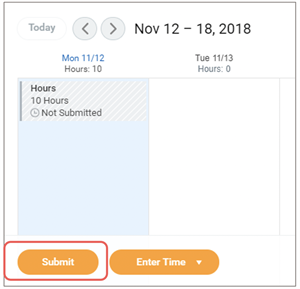
| Compliance Note: You will not be allowed to submit a timesheet with hours worked in the future. You may only submit future time if the week only contains a time off request. |
7. Click “Submit” again to confirm your hours are correct. If you need to make changes, select “Cancel” to return to the ‘Enter Time’ screen. You may also add comments here if you would like to note something on your timesheet for your approving manager.
8. Your timesheet will then go to your manager for approval. If you feel that you have made a mistake and/or need to make a change to an approved timesheet, see instructions here.
Request Time Off
Request Time Off
| NOTE: You CAN select time off for a date in the future. To do this, simply choose the “Select a Week” option to enter PTO Requesting time off within Workday follows the same process as entering hours on your timesheet.for a future date. |
1. Requesting time off within Workday follows the same process as entering hours on your timesheet. Select the week you would like to request time off. If you are selecting to request time off in the future, you should choose the “Select Week” option.
2. From the ‘Enter Time’ page, click on the appropriate day(s) or click Actions --> Enter Time towards the top right of the screen.
3. In the “Time Type” field, select the appropriate type of Time Off. For details on the different types of Time Off, refer to the Total Rewards space.
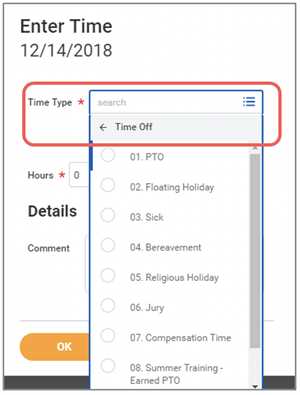
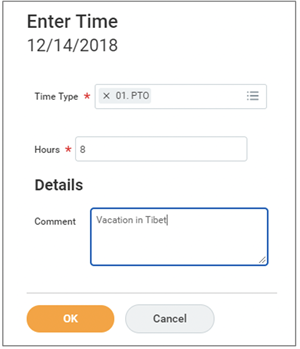
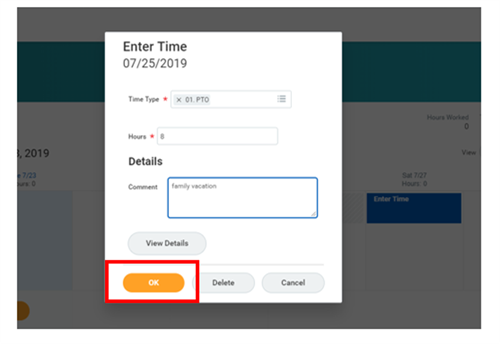
4. After selecting your Time Type, enter the number of hours and add a comment. Time off can only be entered in 1 hour increments (e.g. 3 hours, 8 hours). Note, that the red asterisk (*) indicates a required field.
Click “OK.”
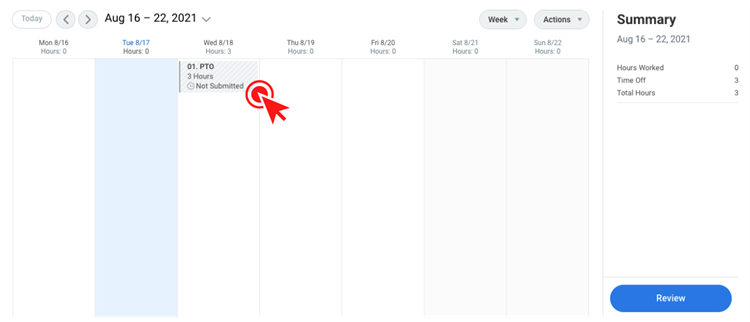
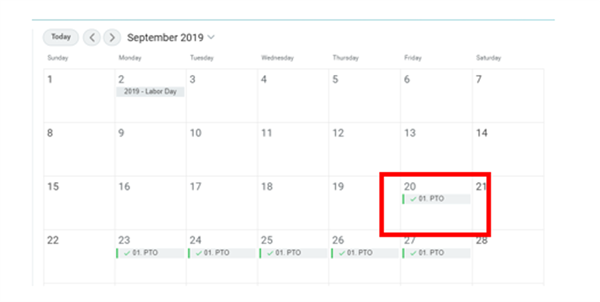
5. If your time off entry is successful, you should see the following on your timesheet:
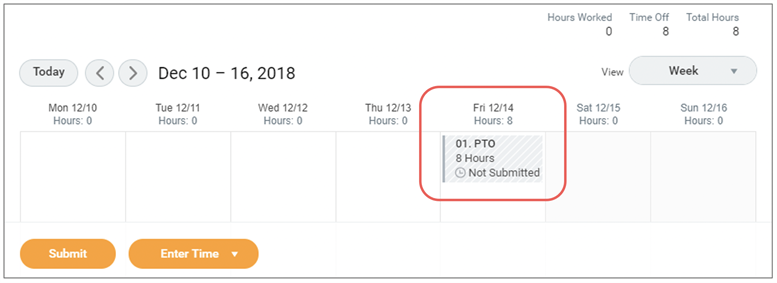
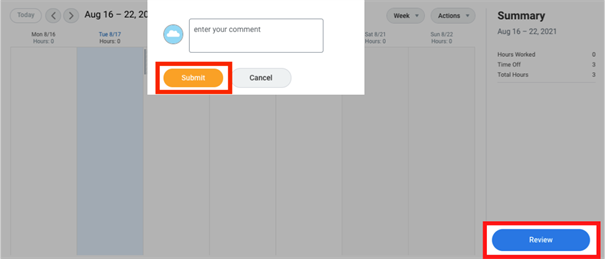
6. Click “Submit” to send the time off request to your manager for approval.
Check Time Off Balance
Check Sick /Floating Holiday Time Off Balance
1. To check your sick time off or floating holiday balances, click the Menu at the upper left. Select the Time icon. Then, select “My Time Off.”
2. Click the second tab called "Absence Balances as of Current Date".
3. Your "Balance As Of Date" shows how many hours are left in your Sick Time Balance and your Floating Holiday Balance.
- Floating Holiday Time Off Plan - Teach For America provides all staff members one floating holiday which equals 1 day/8 hours. If your Floating Holiday Balance shows a balance of 0; this means you have previously taken that time off.
- Sick Time Off Plan - Teach For America provides 10 days/80 hours of sick time per Fiscal Year. Please view our Sick Time Policy to support with possible uses/reasons or hours to take for this time off. The balance renews on 6/1 which is the start of the new fiscal year.
.jpeg?width=1021)
Change Time Off Request
Change a Time Off Request
Correct a Time Off Request BEFORE It Has Been Approved
- Once you are on your Workday landing page, click the Menu at the upper left. Select the Time icon.
- Choose the Select Week option and select the week that you entered time off for and that you need to correct.
- Double click on the time block(s) you would like to make changes to.
- This will open the 'Enter Time' box. Make your adjustments and click OK.
- When you make a change to your time off request and/or timesheet, you must re-submit the timesheet for approval. Upon making any changes to your future time off requests, click Review, then Submit.
- Your timesheet will now automatically go to your manager for approval.
Correct a Time Off Request AFTER It Has Been Approved
- Once you are on your Workday landing page, click the Menu at the upper left. Select the Time icon.
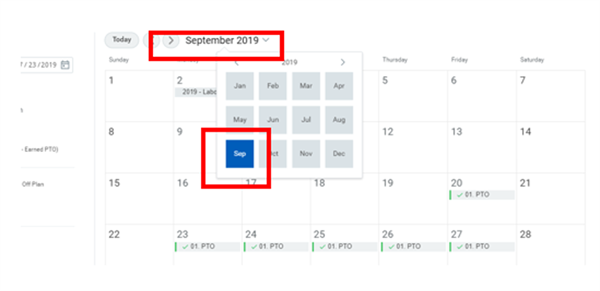
- Choose the Manage Absence option.
- On the next screen, you will see a calendar view. Navigate to the month/day for the approved time off that you need to correct. Here you can make corrections to the time off amount*. Note that PTO and sick time may be entered in 1 hour increments. Other time off types (e.g. Jury duty) can only be entered in blocks of 4 or 8.
 *You may only adjust the number of time off hours. If you need to CANCEL a time off request you must completely zero out your approved time-off by clicking the minus symbol in the pop-up window labeled "Correct Time Off," and submit the change. If you need to adjust the time off TYPE (e.g., changing 8 hours of PTO to 8 hours of sick time), zero out your entered and approved time-off by clicking the minus symbol in the pop-up window labeled "Correct Time Off," submit the change, and then submit a NEW PTO request.
Whatever the scenario, your manager will need to approve your changes. - Once you have made your corrections to your time off request, you must submit them for re-approval by your manager. When you've made all of your changes*, scroll down to the bottom of the Correct Time Off screen and click Submit. *Remember, you may only adjust hours of time off here, not the type of time off.
- Upon re-submission, your timesheet will go to your manager for re-approval. Once the request is reviewed and approved, it will be reflected on your timesheet.
Viewed 4,170 times